Sunday, May 5, 2013

Ribbon Sandwich

Got a lot of people coming over and can't figure out what to serve?! Try making these Ribbon Sandwiches! They're healthy, easy, and quick to make! Watch the video and follow along!

 
It's quick so I'll skip the ingredients and just tell you the method!
Start by grating half a head of cabbage and four cucumbers! (This should serve 10 people)
Then wrap it up in a cloth and squeeze out as much water as you possibly can and then empty it into a big bowl. Add 4oz of Coriander chutney to the bowl and mix well. Finally in order to serve place the mixture between two breads and don't forget to place a serving of ketchup to make it taste better!
I recently made these sandwiches at a picnic and not only did the adults love it but the kids loved dipping these sandwiches in ketchup! Like I said, it'll be a hit all around!


  Creative Commons License
VibRecipes by Vibhuti Raja is licensed under a Creative Commons Attribution-NonCommercial-NoDerivs 3.0 Unported License.
Based on a work at www.vibrecipes.blogspot.com.

Thursday, April 25, 2013

Khichdi

Khichdi is a meal that is simmered in a single pot. It is the ideal food for campfires and soup kitchens. Khichdi is the food of the poor, a meal that is accessible even with the food budget stretched to its limits. Khichdi is the food of the rich, a showcase for the choicest vegetables simmered with a plethora of lentils and studded with nuts. 


A little history behind this dish via India Currents :
"Mughal cooks certainly knew how to take a simple country food from the streets and enrich it in the palace kitchens for royals. They are the ones who gave this humble meal, a rich gourmet appeal. During the Mughal dynasty (1400—1700s), the traditional khichdi went through various adaptations. They made it rich by adding strong spices, dry fruits and nuts. In Ain-i-Akbari, a 16th century document about King Akbar, Abu’l Fazl mentions nearly seven variations of khichdi preparations A Russian adventurer, Afanasiy Nikitin, who traveled to India during the 16th century, declared that the Mughal Emperor Jahangir popularized this dish and it is believed that Emperor Aurangzeb was particularly fond of khichdi. During the British colonial rule (1858— 1947), the khichdi recipe was modified to suit the  Anglo Indian palate, by adding fish and eggs to the ingredients. Kedgeree, as it was called, became popular during the British era as a staple breakfast food. It soon spread outside India to the UK during the reign of Queen Victoria. According to one hypothesis, however, the dish originated in Scotland; it was taken to India by Scottish troops during the colonial period, where it was said to have become part of Indian cuisine. Later the dish found its way back to UK. This hypothesis is documented in The Scottish Kitchen, by Christopher Trotter, a National Trust for Scotland book. Trotter traced the origins of kedgeree to books dating back to the year 1790. Despite that, general opinion still considers khichdi a quintessential wholesome, mildly spiced Indian dish."

Rather than a recipe, I'll provide you with a method on making Khichdi!
  • To make khichdi, heat oil/ butter/ghee in a pot, fry 1 tsp. of cumin seeds and some minced onion for a couple of minutes. 
  • Season with salt and turmeric and a dash of garam masala
  • Add a few cups of mixed diced vegetables (any combination of potatoes, eggplant, peas, carrots, cauliflower, green beans, spinach, tomatoes is generally used). 
  • Add a cup of rice and half a cup of lentils (I generally use a combination of red and yellow split lentils). 
  • Add 3-4 cups of water and simmer the whole thing till done. It should be mushy and comforting. 
  • Garnish with minced cilantro and generous dollops of ghee.
Creative Commons License
VibRecipes by Vibhuti Raja is licensed under a Creative Commons Attribution-NonCommercial-NoDerivs 3.0 Unported License.
Based on a work at www.vibrecipes.blogspot.com.

Sunday, April 21, 2013

Healthy Choices in Indian cuisine

Traditional Indian food can be a healthy choice with a balanced diet of starch (steamed rice, Roti), tons of vegetables, dal (lentils), yogurt, saag etc. Unfortunately, you will also find many fat-laden Indian dishes in restaurants. Those dishes are great for festive, once in a while, occasions. However, for a regular healthy eating, here are suggestions for some lighter alternatives.

Healthy Indian Starch  
When you are ordering curry or vegetable, order steamed basmati rice, which is healthier than fried variety such as Pulauo or Biryani. Make sure that your steamed rice does not come with generous serving of Ghee. Indian flatbreads, Roti or Chapatti are healthy than other fried flat bread Poori or stuffed Paratha.

Naan, the leavened oven baked flat bread is healthy as well in moderate portions. The key is to avoid extra butter or Ghee coating on your bread or rice.

Healthy Indian Appetizers 
Anything fried such as Samosas or Pakoras are delicious but full of fat, starch, and salt. Instead, get thin lentil wafers, papadum or papad. Make sure to get roasted papads instead of deep fried ones. Many modern Indian restaurants now serve healthy baked alternate appetizer to fried ones too.  

Healthy Indian Main Dishes
 Curries are one of delicious ways to eat healthy vegetables - as long as it is not cooked in creamy sauce. Dal, which is lentil soup/curry, can be eaten by itself or usually eaten with rice or bread. Avoid eating too much dal because like any soup it is high on sodium.

Any meat dish or vegetarian dish with name such as Korma, Makhani, Malai, butter are creamy artery-clogging sauce. Most restaurants serve big portions of these curry, you can enjoy them in small portion by using it to flavor rice and flatbread, as it meant to do. Healthy meat alternates include tikka (not creamy tikka masala) and tandoori meats, which are oven-roasted. 

Healthy Indian Desserts
Like any desserts, Indian desserts are sinful, high in sugar and fat. However, all Indian desserts come in comparatively small portions. Stick to the small portions.

*When in doubt, ask your server about content of the dish and decide yourself rather than simply asking for subjective judgment if it is healthy. Like any food, in right portions, even unhealthy seeming Indian food can be consumed healthily. In restaurant best way to do is share dishes. Usually two dishes are enough for three people with big appetite. Another extreme way of portion control in Indian restaurants may be get hottest side of spicy food.


Friday, April 12, 2013

Bhel Puri

Bhel Puri is a savoury Indian snack, and is also a type of chaat. It is made out of puffed rice, vegetables and a tangy tamarind sauce. Bhelpuri is often identified with the beaches of Mumbai (Bombay), such as Chowpatty. But with my recipe, you won't have to go to the beach to get this yummy dish, instead bring the beach to you!

Just a heads up, there's all sorts of different ways to make Bhel Puri but I will give you my version that I like the best!

Ingredients:
  • Puffed rice (available at stores) 3 cups
  • Two boiled potatoes, peeled and chopped (optional, I hate potatoes so I skip them).
  • One large onion finely chopped
  • Half a bunch of coriander finely chopped
  • Tamarind chutney to taste
  • Mint-coriander chutney to taste
  • Sev (vermicelli-like snack made from gram flour and available at stores) 1 cup
  • Puri (available at Indian stores)
  • Raw Mango chipped fine.

Now the method itself is quite easy! All you do is mix the puffed rice, onions, and chopped mango into a large bowl. Then add tamarind chutney and mint-coriander chutney as much as you want, depends on taste, and mix again! Finally after all of that is mixed together nicely, sprinkle the sev all over...I like lots of it so I add accordingly! Also add the coriander as needed and serve with Puri! Its my favorite dish and I love that I don't need to go all the way to Mumbai if I am craving this!


Sunday, March 31, 2013

Vegetable Manchurian with Gravy

Indian-Chinese cuisine is very popular in India, UAE, and the US. Unless you're from India you aren't really exposed to all the wonderful dishes that Indo-Chinese cuisine has to offer. Thanks to me, however you can learn a few dishes and show it off to your friends and family! This one is a little hard to make and requires some patience but at the end, it'll be worth it! Good Luck!


For the Vegetable Manchurian balls:
Cabbage – 4 cups, finely shredded
Carrots – 2 cups, grated
Onion – 1 medium, finely chopped
Garlic – 4 large cloves, finely chopped
Green Chilies – to taste, finely chopped
Salt & Black Pepper – to taste
All-purpose Flour – 6 tbsp or as needed
Corn Starch – 2 1/2 Tbsp
Oil for deep frying


For the Sauce:
Oil – 1 Tbsp
Ginger – 2 Tbsp, minced
Garlic – 6 large cloves, chopped
Green Chilies – to taste, finely chopped
Soy Sauce – 1/4 cup
Sugar – 1 1/2 tsp
Corn Starch – 1.5 Tbsp
Vegetable Broth (stock) – 3 cups
Spring Onions – cut at a diagonal for garnishing

 
 Method:
 1. Heat the Oil well for deep-frying on medium heat.
2. Prep all the vegetables.
3. In a large bowl, mix the following: Cabbage, Carrots, Onions, Garlic & Green Chillies.
4. Mix gently but well.
5. Mix in Salt, Pepper, Corn Starch & Flour.
6. Sometimes, the Vegetables may need more or less Flour and Starch depending on how fine they have been shredded. Adjust those two as needed. You should be able to form a ball.
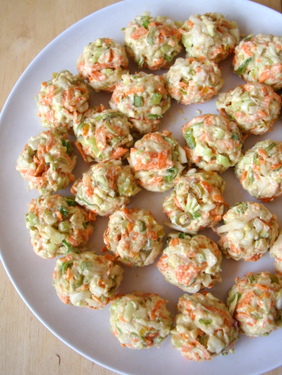
7. Form balls and drop into hot Oil and fry till golden on all sides.
8. Remove into a paper towel. Fry all the Vegetable Manchurian Balls and keep aside.
9. For the gravy, take a wok and heat Oil (1 Tbsp) on medium flame.
10. Add Ginger, Garlic & Green Chillies and saute for 30 seconds.
11. Add in the Soy Sauce and mix.
12. In a separate bowl dilute the Corn Starch with some room temperature Stock or Broth. Mix well till there are no lumps.
13. Add in the balance of the Stock and mix into the wok.
14. Add in Sugar to balance.
15. Additional Soy Sauce or Sugar may be added to taste.
16. Bring the gravy to boil and allow it to thicken up a bit.
17. Once it is thick enough, turn off the flame.
18. Place your Manchurian Balls in a serving dish and pour the hot gravy over it.
19. Garnish with Spring Onions and serve Hot.


Tips:
1. Do not fine shred the vegetables where they get limp and mushy.
2. Do not over-work the vegetables while mixing.
3. It is very important to prep all the vegetables when you are making Chinese or Indian Chinese Cuisine.
4. If you are making the Manchurian for a party, make the balls and keep them hot, make the gravy minus the corn starch. Add the Corn Starch to the gravy the last possible minute to thicken up and then add the Manchurian Balls.

Tuesday, March 26, 2013

Butter Chicken

Butter Chicken, also known as Chicken Makhani, is a very rich and popular dish! Considering how often its made at my house and the fact that my two toddlers eat this dish too, I had to make it a little more healthy without compromising on the taste. Butter Chicken is one of those dishes that very few restaurants can ever get wrong because every cook has his or her own little variations and that's what makes this dish unique and yet, fantastic
Ingredients:
Oil- 1tsp or as needed
Chicken – boneless skinless breasts or thighs (your choice of quantity)
Red Chili Powder –1tsp
Turmeric Powder- 1tsp
Cumin and Coriander Powder- 3tsp
Salt – to taste
Ginger & Garlic Paste – 1tbsp
Cloves- 3
Cinnamon Stick – 1
Bay Leaf – 1
Onions- 1 big onion, chopped
Crushed Tomato- 12oz can
Sugar – 1-2 tsp
*Heavy Whipping Cream – 1 cup or to taste
Cilantro – 3 to 5 pieces, finely chopped

Method:
1. Cut the Chicken to bite-size pieces and wash it well.
2. In a medium size pan on medium heat, add the oil.
3. Once hot, add the bay leaf, cloves, and cinnamon stick.
4. Add onions into the pan and stir well.
5. Sprinkle 1tbsp salt and simmer on medium-low heat till onions look translucent.
5. Add the ginger-garlic paste.
6. Pour in the crushed tomato and stir well, let the oil work itself into the tomato puree.
7. Add the red chilli powder, turmeric, and cumin-coriander. Stir again.
8. Add more salt (to taste) and 1-2 tsp sugar.
9. Add the Whipping Cream and the pieces of chicken.
10. Let it cook for about 15 min but remember to stir it every few min.
14. Garnish the cilantro while serving.

* Substitutes for Heavy Whipping Cream – Half and Half, Evaporated Milk, Lactaid, Milk or Milk Powder (so you can control the water).
*In the past when I needed to make this quickly, I have used Cooked Tyson Chicken Strips for this recipe instead of raw chicken and it still tasted great!

Sunday, March 17, 2013

Super Easy Chicken Fajitas


Ingredients:
  • Oil (1tbsp)
  • 1 packet fajita seasoning
  • Strips of green, red, and yellow peppers (1 bell pepper of each color)
  • Onions cut in long strips. (1 big onion)
  • Water (as needed)
  • Chicken strips (1 lbs)
  • Tortillas
  • Lettuce
  • Mexican Cheese
  • Sour Cream
  • Salsa
  • Lime

Method:
  1. Heat 1 tablespoon of oil in a large nonstick skillet with onions, green yellow and red peppers, and cooked chicken strips. 
  2. Empty the contents of the fajita seasoning packet into the skillet and cook over high heat, stirring occasionally, until the vegetables are crisp-tender and the chicken is marinated through, about 6 minutes.
  3. Add water to thicken the fajita sauce and keep stirring for 3 more mins.
  4. Transfer the chicken and vegetables to a large bowl and serve with the warmed tortillas, lettuce, cheese, salsa, sour cream and lime wedges.  

Szechuan Egg Fried Rice


Ingredients
  • oil-3tbsp
  • Butter-1tbsp
  • Bay leaves-1 no
  • Basmati Rice -2 cups
  • onion-1(sliced)
  • Green onions -3 (chopped)
  • Bell Pepper-1(de-seeded,cut into cube size)
  • Green chillies-2 nos(chopped or sliced lenghtwise)
  • Ginger and garlic paste-1tbsp
  • Red chili powder-1/2 tbsp
  • Szechuan stir fry sauce-1tbsp
  • cooking soy sauce-2 tbsp
  • Red chili sauce-1 tbsp(according to your spice level)
  • Scrambled Eggs (4-5 eggs)
  • Salt to taste
Method of Preparation

Gravy
  1. Heat oil in a pan and add the sliced onions fry for few minutes, then add the ginger and garlic paste fry for 3 min.
  2. After a few seconds start adding the sauces one by one as per the quantity mentioned above.
  3. Stir the mixture in low flame.
  4. Now add the sliced bell pepper into it and cook for like 5 minutes and remove it from heat.
Preparing Rice
  1. Soak the rice for 15 minutes.
  2. Heat 1 tbsp of Butter in a large frying pan and add the soaked rice in it, fry for a few min. (make sure the rice doesn’t turn brown) Just fry the rice slightly take it out and put it aside.
  3. Now take a pressure cooker, pour a little oil in it, add bay leaves and add the fried rice with water and add 1 tsp of cooking oil on top of it (add the water according to the ratio of rice)
  4. cook for 1 whistle in medium heat. (don’t pressure cook more than one whistle because the rice is soaked and fried already).
  5. And then mix the rice with the gravy we prepared before, gently mix the rice and gravy together but be sure not to break the rice.
  6. Finally garnish it with green onions on top of it.
Tip
You can add minced chicken for making chicken fried rice or any other meat of your choice.

Sunday, March 10, 2013

Health Benefits of Indian Spices

Indian cooking has a lot of spices in it, some of which provide astonishing health benefits. The below table gives you a look at what you gain from two of the main ingredients in Indian foods!

TurmericRed Chilli Powder
Blocking CancerContains trace amounts of vitamins and minerals
Powerful AntioxidantPain Relief
Potent anti-inflammatoryCancer Prevention
May prevent and slow the progression of Alzheimer's disease by removing amyloyd plaque buildup in the brain. Weight Loss
Natural Liver DetoxifiesLower Risk of Type 2 Diabetes
Natural antiseptic and antibacterial agentBoost Immunity

                           *via http://www.flickr.com/photos/arifaqmal/3729246510/

Saturday, March 2, 2013

Sunday, February 24, 2013

Thepla

Gujarati's and snacks can never be parted! And we can honestly say, Gujarati's do make the best snacks! "Thepla" (th-ape-la) is easy and amazing and right from the State of Gujarat and now we can all relish and enjoy it. It is a bread or a snack that is healthy (no frying needed), full of flavor and has a great shelf-life. Make a few or a lot and take it along for whatever your path and make some great Thepla memories.


Prep Time: 7 min                   Makes: 7-8
Ingredients:
Whole Wheat Flour (Chapati Flour) – 1 cup
Yogurt – 1/2 cup
Sugar – 1 tbsp
Minced Ginger – 2 tsp
Minced Garlic – 2 tsp
Cumin Powder -1/2 tsp
Turmeric Powder – 1/4 tsp
Red Chili Powder – 1/4 tsp or to taste
Green Chillies – to taste (minced)
Salt – 1 tsp or to taste
Kasoori Methi (Dried Fenugreek Leaves) – 2 tbsp
Spinach- chopped 1/4 cup
Baby Carrots- Grated, 4
Broccoli- Grated 1tbsp
Oil – 2 tbsp
Oil – for pan frying
Method:
1. Combine the Follow in a bowl – Yogurt and Sugar.
2. Mix well and break down all the lumps.
3. To this add – Ginger, Garlic, Cumin Powder, Turmeric Powder, Red Chili Powder, Green Chillies, Salt, Kasoori Methi (Dried Fenugreek Leaves), Carrots, Spinach, and Broccoli.
4. Mix again and set aside till ready to use.
5. To make the dough add the Oil (2 tbsp) and work the Oil into the flour till well incorporated.
6. Add in the Yogurt/Spice mixture and make a dough without using any additional Water.
7. Once it all comes together in a dough, knead for a few minutes.
8. Heat a Tawa on medium heat till nice and hot.
9. Divide the dough and make golf size balls.
10. Take one and form a smooth ball and then flatten with your palms.
11. Dust in some Whole Wheat Flour and start rolling it with a rolling pin on a flat surface.
12. Roll it out similar to Chapati or Tortillas for thickness.
13. Once done rolling, dust off excess Flour and place it on the hot tawa.
14. Move the Thepla a little so it does not stick and the allow it to cook on the underside till you see a few bubbles appear.
15. Once the bubbles are visible, flip the Thepla and allow it to cool on the other side.
16. Drizzle a little bit of Oil, spread it and flip it.
17. Press down gently but firmly with a flat spatula – pressing and turning as you go.
19. Apply Oil on this side as well and flip and press down again till it inflates.
20. Take off the tawa and transfer into an insulated Container till ready to eat.

Tip:
1. Make a big batch and store in the refrigerator and use as needed. They have a great shelf-life.
2. Take on long (or short) road trips or travels.

Upma

Rather than the boring breakfast of toast and cereals, jazz up with some spice and flavor. This quick and easy Upma (oop-ma) recipe is traditionally served for breakfast but there's no rule that you can’t enjoy it any other time of the day.


Suji/Sooji/Semolina – 1 cup
Oil – 1 tbsp +1 tsp
Mustard Seeds – 1/2 tsp
Cumin Seeds – 1/2 tsp
Urad Dal – 1 tsp
Broken Cashews – 1 tbsp
Dry Red Chili – 1
Asafoetida – pinch
Curry Leaves – few
Green Chili – to taste, finely chopped
Ginger – 1 tsp, grated
Onions – 1 small, finely chopped
Peas & Carrots (optional) – 1/2 cup
Salt – to taste
Water – 1.5 cups
Yogurt – 1/2 cup, well-beaten
Cilantro – garnish, finely chopped

Method:
1. In a heavy bottomed pan on medium heat, pour in 1 tsp of Oil.
2. Add in the Suji and roast till it starts to get a little golden color and emits a wonderful aroma.
3. It is very important to keep stirring as Suji tends to burn.
4. Once done, transfer the Suji to another bowl to stop the cooking process.
5. On medium heat, in a non-stick pan, pour in the 1 tbsp of Oil.
6. Allow it to heat up and then add in the Mustard Seeds.
7. Once they start popping, add in the Cumin Seeds, stir and add in Urad Dal.
8. Cook for 30 seconds and add in the Broken Cashews and allow them to turn light golden in color.
9. Add in the Dry Red Chili and Asafoetida and then mix.
10. Add in Green Chili, Curry Leaves, Onions and Peas & Carrots.
11. Saute until the Onions are cooked but not browned (look in tips).
12. Also, add in salt at this time.
13. Meanwhile, mix the Yogurt with the Water. Pour into the pan. Keep mixing.
14. Add in Ginger and allow the liquid to come to a boil.
15. Once it comes to a boil, lower heat and add in the Suji little at a time.
16. Mix really well and make sure there are no dry lumps/spots of Suji.
17. Cover and cook for 2-3 minutes.
18. Open the lid and mix and fluff up the Upma.
19. Turn the flame off, cover and allow it to rest for another 5 minutes.
20. Open and serve with Cilantro as garnish (lime juice optional).
21. Serves 4.

Tip:

1. When you need to cook the Onions and not brown them, best thing to do is to sprinkle a little water. This adds moisture to the onions and cooks them without browning them.